12.09.2013

Shearer Step Twelve - Seaming

With only one cuff left to knit last Thursday evening I ran out of washed wool. With holiday outings cramming the weekend it was not until late Saturday evening that I had a rolled ball of clean yarn and could knit the cuff and block the sleeves. (I left the body of the sweater out of the Soak Bath immersing only the sleeves) I couldn't get to seaming until after dinner last night.

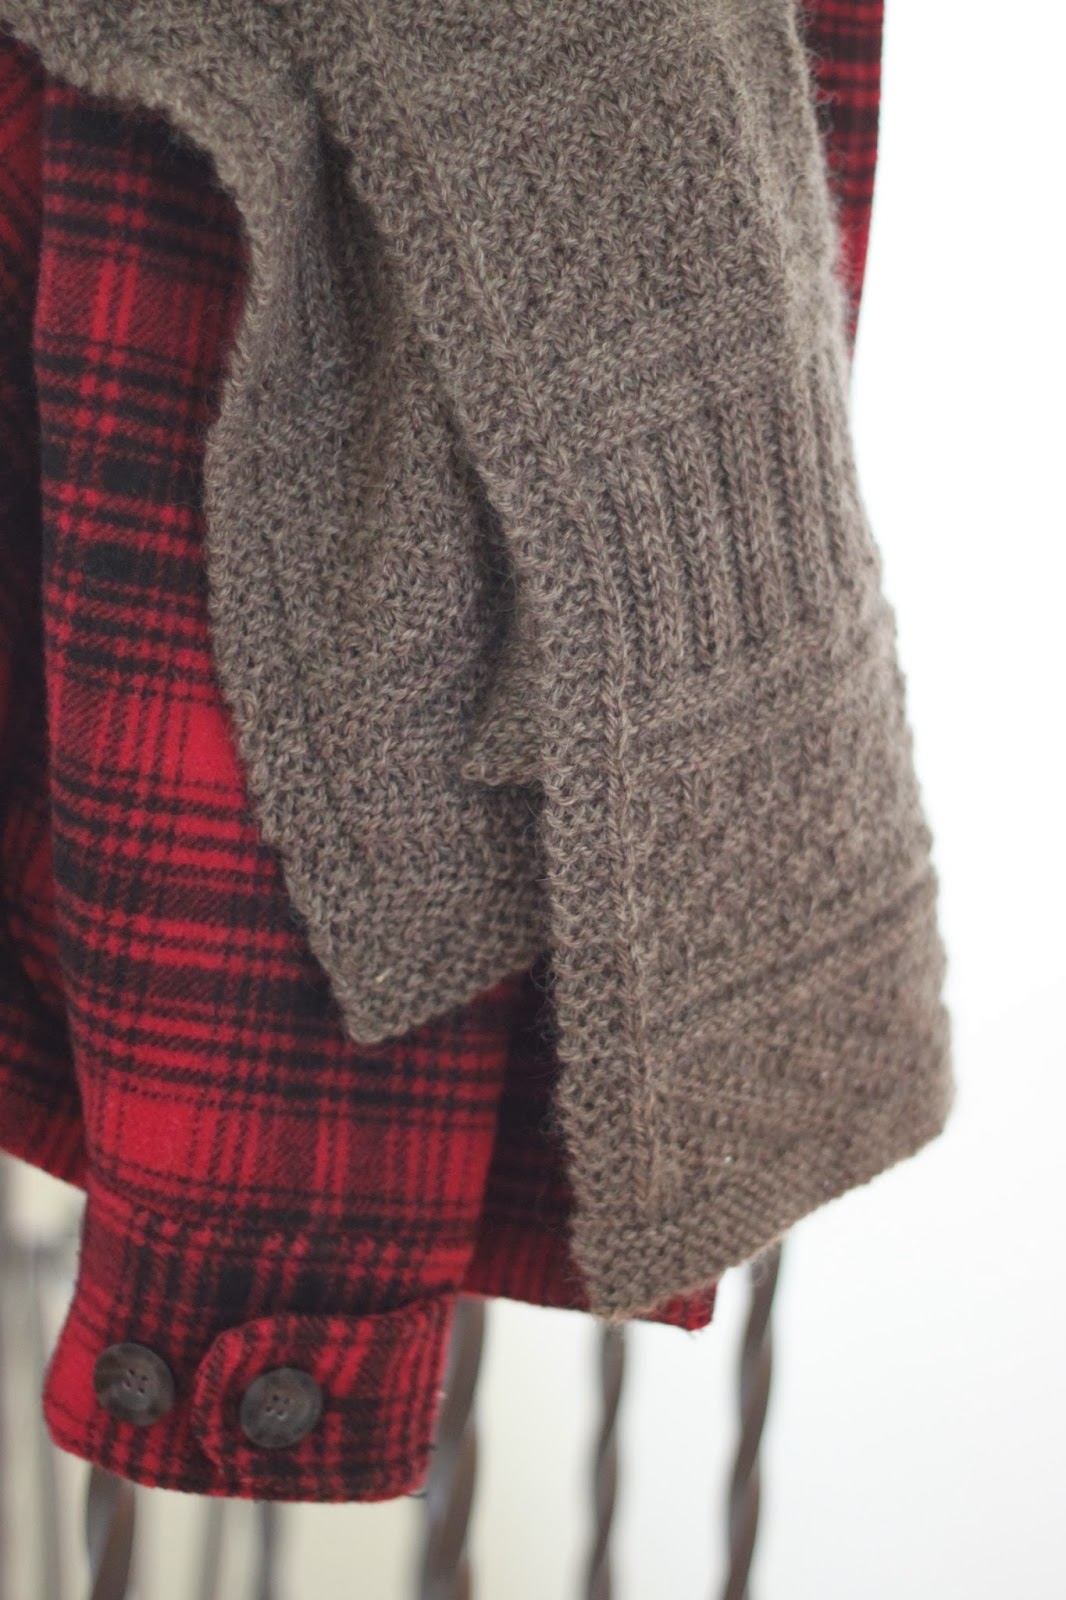
I worked outwards from the underarm down sleeves and then body. It took a few attempts through some sections to get something roughly symmetrical and tidy but I'm pretty pleased with the results.

Then, of course, there were the few ends to deal with before finally affixing my little label onto the collar.

The DKC Work of our Hands Fashion Show is this Wednesday so I made it (just!) within my planned timeline! (Queue the Hallelujah Chorus!)

Unfortunately neither the sweater nor either of us will be at or in the show as I have to head to NYC tomorrow until the end of the week with Number One Son. (Hudson will not be pleased!) We'll have to take Shearer to a regular DKC meeting Show and Tell in the New Year instead.

Thank you for all your wonderful expressions of moral support over the past 51 days of knitting. I had to push this one through, at times leaning heavily on your heartfelt and informed encouragement!

Now I just need to wrangle a model for some FO shots!

 As ever, thanks so much for dropping by!

12.04.2013

Can You Tell?

I'm not posting until Shearer is done. So, so close now. Just a few inches left. Block the sleeves, two side seams to sew....unfortunately I have to go out tonight - 'tis the season after all.

Nonetheless...so, so close and you'll be the first to know when it goes from WIP to FO!

11.29.2013

By this evening...

...I'll be k2p2-ing on Sleeve #1! (Before My Beloved climbs on yet another jet I'll be able to check for final length and cast that baby off!)

With the collar already done, sleeve #2 in the cross hairs means I'm 'almost there! Not that far off my December 1st Goal - by the end of that day I should be well on my way down the sleeve.

Aaaaand worries about running out of yarn were banished by the arrival, yesterday, of the make-up skeins. Pre-washing there is no difference between them and the one remaining unwashed skein from the first shipment! (the one bearing the label in the photo below)

Have a great weekend! I plan to! thanks for dropping by!

11.27.2013

Progress!

After playing with various elements on the Shearer sleeve over the weekend I arrived at something acceptable about 10:00 p.m. Sunday evening. Good thing too - I wasn't going to bed until it was sorted. This was guilt-based determination having spent what could have been valuable knitting time, instead yarn shopping over the weekend (Romni  - 2 visits and Eweknit) as well as working on a little project other than Shearer for a couple of hours Saturday night. I'll tell you it made the sort-out-the-sleeve-slog all that much more painful.

In the end, pushed through the "pain". Here's what I came up with...

  • Sleeve cables nonsensically springing out of the purled section at the shoulder edge...picked up alongside the last knitted row, relegating the purl rows to inside, out of sight...also gave the cables visual breathing room by working one knit row before doing the set up for the cables on the next row.

  • The pointed pucker at the shoulder seam generated by quickly starting with the central cable cross ... repeated the set up row 2 more times putting off crossing that first central cable cross until row 5.
  • Excess fabric in the sleeves...cast on 10  fewer stitches and only worked 8 short rows, 4 per side, 5-7 stitches apart keeping the wraps "hidden" in the purled columns. (This, rather than short rows every row on more stitches as I did the first time through) I got 2" of extra depth for the shoulder by doing this while minimizing bunching of the bulky fabric under the arm and eradicating the resulting waviness on the sweater itself..

I've learned putting some daylight between sleeves and body (with narrower sleeves and higher armholes and sometimes, although, not in this case, waist shaping) breaks up the visual sense, in a bulky sweater, of one continuous mass from outside sleeve to outside sleeve. I want the "look" of the person wearing the sweater rather than the other way around. So I'm happy to now be working away at a slightly slim sleeve. This is also good for yarn conservation - still unsure about quantity but I'm cautiously optimistic.

Monday night at Craft Group (baking this month - Spicy-Gingery, Snappy, Ginger Snap Cookies) I was able to show the whole Shearer works off to very appreciative "audience" - don't you just love knitters? (And Crocheters!)

After that reception getting back "into" it full force was a little easier. I'll miss my December 1st goal but like the yarn, it will be close. I have a few Christmas season knits waiting in the queue - only one of them a Christmas Gift - and I am keen to get onto them (and off of this!)

Thanks for dropping by - knowing I needed to "report" on progress this week helped a lot with that weekend work at "pushing through the pain"!

11.21.2013

Shearer Short Row Shoulder Shaping (Try to say that 10x fast!)

Finally -  the sleeves! (And finally a bit of a hitch.)

Picking up from the shoulder and working the chart downwards, knitting flat. The plan, to accomplish the short rows for both sleeves before knitting on down towards 2x2 ribbed cuffs.
Picked up,  across the length of the arm hole, the number of stitches called for in the pattern for the top of the sleeve. Used the usual "pick up 2, skip 1" approach. Marked the centre point and each of the cable elements either side of that then tweaked the number of stitches a bit to make the sides match.
Then, working the chart from the top also put in short rows, every row, either side of just over half the stitches at the centre of the work.

With the planned short rows done, the bulging excess of fabric tells me I've done too many. 

I also see my wraps and turns among the ribs are probably best described with words I don't want to put on my blog.

Both these problems are easy enough to fix.

Less clear is how to address the fact the sleeve cables seem to be springing out of the the visual no man's land of the purl section along the top of the shoulder edge. At the underarm, where the ribs visually connect with the sleeve detail, its fine but then it all falls apart - crappy wraps and turns aside - once you get beyond that point...

Ewwwww.  Hmmmm. I'm going to have to ponder this a bit....

  • Obviously, what I've done so far has to come out but then what?
  • Duplicate stitches across to the first rib of the body sections spring to mind but seem a cheap fix.
  • Picking up the sleeve stitches from closer to that rib also occurs to me....not sure what the drawbacks of that might be fit-wise since the body I'd need to measure against is currently somewhere across the Atlantic.
  • I could work the sleeves bottom up and then sew them in to best visual advantage.
  • I think I've already ruled out working the sleeves without cables so as to render the issue moot.
Yup, 'off to ponder...
 
Thanks for dropping by!

11.20.2013

Shearer Step Ten - The Collar

3" of 2x2 ribbing atop stitches picked up to visually incorporate the cable elements into the collar.
I'm getting more and more confident with with knitted "lying"!
"Live" stitches atop the collar sewn  to the stitches picked up at the collar's base...
I like how the doubled collar compliments the "beefy" scale of the almost 46" sweater. (4" pos. ease)

I'm thrilled with how...

...the cable elements open outwards to frame the collar and of course, ultimately, the face above it.
...seeming to flow into the collar rather than appearing truncated in deference to fit or structure.
The back neck is just the right additional height above the front.

Yup I'm thrilled with how this bit turned out! (Kinda makes up for the grafting issues.)

So now I'm onto the short rows of the sleeves. (Pics to post on that tomorrow.) I'm placing them amid the 2x2 ribbing either side of the sleeve cables which need to be worked from the chart top to bottom - a bit tricky, after working the charts bottom up for a month, 'have to turn off the "autopilot" and stay conscious enough to work them backwards!

(5 weeks in - just gotta keep going - almost there!)

11.19.2013

Shearer Step Nine - Grafting Shoulder Seams

Again, Lorraine's sage advice from the comments rang in my ears as I sat to graft the shoulders. I couldn't expect absolute perfection  - at best things would be off a step for each stitch. Also, I knew with my less than perfected grafting skills I'd be doing well to achieve even that! So I just tried to get the thing to give the impression of continuity across the shoulder join.

I set up on a table with great light and grafted only a few stitches at a time. then I'd walk away, come back and look with freshly critical eyes and several times, ripped out and started again.

I'd worked one cable element (the one pictured at the bottom in the shot below) to a point where they were just about to cross as they met so I crossed the stitches (on the panel on the right) without actually having knit them that way. It gives the impression the cable spans the seam, hopefully distracting the eye from seeing where the pattern isn't as well aligned where the next element meets.

In fact, to make sure that one cable element was exactly right... (again, I'm talking about the bottom one in the shot below)
I started the graft at that point, several stitches in from the edge then went back to graft the skipped stitches afterwards. this let me hide the one stitch that was off alignment out of sight in what will be the eventual shoulder seam with the sleeves.

I'm very happy with how the shoulder seam relates to the collar and thrilled with the collar itself.

Details on all that tomorrow! Thanks for dropping by!


11.18.2013

Shearer Step Eight - Blocking Front and Back Panels

Last Thursday evening I wet blocked the two completed panels to the exact specified measurements.
While I was at it I made sure all the cable elements were straight up and down. Then I pinched each "rope" along its length from bottom to top to ensure each would seem plump and uniform.

Then I turned a small fan on over the blocking board and indulged in knitting colourful mittens,  long neglected in the basket, because there was nothing to be done on Shearer until it was dry. A guilt-free break from a month of knitting monogamy. That felt good!

The pieces blocked beautifully just as Lorraine had assured me in the comments they would. I only had to pull a few T-pins out to see how right she was -  the wet stretched fabric stayed exactly where I'd placed it to dry - perfectly aligned with the desired measurements.

Everything was ready to go for grafting the shoulders and working the collar Friday night (and maybe a bit into the wee hours of Saturday morning) I took my time with the grafting and with how the 2x2 ribs of the collar would arise out of the front and back panels. More on that anon!

Thanks for dropping by today!

11.15.2013

Shearer Step Seven - Collar Shaping


'Started this part of the project very early last Saturday morning with the house still quiet, a fresh pot of coffee and a big poodle curled up at my feet...bliss!

My goals - beyond making a hole for the head and neck of course...

  • Avoid cables crossing close to the collar edges making choke-like puckers around the collar or worse, partial, half crossed cables.
  • Decrease to edges that lend themselves to the 2x2 rib that will progress upwards from that point.
  • Make nicely terminated, and visually complete cables at the shoulders to border the planned saddles. 

I worked out the bulk of the approach on one back shoulder...

4 hours to sort out that 4 inches of knitting.

That was okay - the rest should fly from there! The second back did sail along, as did the first front.

But the last....most tantalizing...close to the finish line...only 20 minutes more...front panel took...

4 runs over 4 evenings to get right. 
Rushing always takes longer. When will I ever learn?

In fairness this part of the exercise has shown me just how much I have learnt over the past few years of, some non knitters would say, "manic" knitting. (Anyway "rushing" is more about human nature than knitting!)
Sweater Front atop Sweater Back showing two different collar lines
I'm very pleased with the results.

  • The net effect does visual justice to the time and care I took at the bottom edge.
  • I think I've set things up so the collar will nicely "flow" from the cables on the body.
  • The termination at the shoulder edge of all the elements either side of the collar is such that the saddle shoulder is unnecessary. (Good thing because despite fiddling with a variety of treatments for that element they all just struck me as too busy to nicely bisect front and back and flow into the cabled sleeves.)
After 4 weeks of strictly monogamous knitting and 3 1/2 weeks before my "deadline" I'm off to block these two big pieces to 23 1/4"wide x 27"long.

Tonight and tomorrow I need to graft the shoulders and see if I can't get the visual affect to be one of having the elements flow continuously up and over the shoulders. (I'll ultimately run a reinforcing something-or-other on the backside of each graft for stability) and put in the collar.

Beloved gets on another plane tomorrow night. My hope would be I could pull something with a finished collar over his his before that so I can confidently knit and  install the sleeves while he's away over the next 7 days, finalizing only length upon his return! He's been here and gone a couple of times over the last week after returning from Asia ten days ago. I'm getting good at taking measurements while he sleeps off jet lag!

Have a great weekend! Thanks for dropping by

11.08.2013

Oh and By the Way...

...I might run out of yarn for Shearer - well, not exactly yarn - this yarn, the yarn I've been using. More yarn will be shipped to me, it just won't match what I've already got.

The mill wound most of the skeins short by about 20%. Juniper Moon has had to have them make new yarn with a different mix of fleeces.

It'll be here soon.

I've known this for a while - but I was already too far into it to stop so I've just kept on going.

Every so often I weigh what I've knit and what remains. It'll be close.

I've decided I'll use the new yarn, if necessary, to work the ribbed undersides of the sleeves and the gussets down the sides, if I end up adding them. Then I just put the whole problem out of my mind and keep on cabling.

Between fit, deadline and yardage, this one's a nail biter!

11.06.2013

Comments

Comments chez Sel and Poivre have recently been difficult/spotty/impossible because, I suspect, of my use of what Blogger calls a "Dynamic" template. (It makes the home page feature those spinning/flipping images.) So I've gone back to  a Template they call "Simple" where the comment option should be consistently present.

And speaking of comments - for anyone interested in reading on - here's mine on our "Mayor" (title only - lets face it, for months, if not years we haven't had a functioning one).

Why does his family support and facilitate the public spectacle of his personal spiral? Why don't they get him into rehab? Further, how can they let his children continue to witness and endure this?

His almost daily bizarre behaviours dominate the media but what about the racist and homophobic slurs he spouts during his public episodes of drunkenness?

His substance abuse is an illness. His intolerance just "sick".  Dry, clean and sober he's unfit to lead the city he says he loves. But then, if he's using his own family's demonstration of what "love" looks like he's got a pretty poor example to follow.

As for the next election - I don't think we need to worry about Robbie for that one - on his current path how can he still be in any shape to participate in that one?

I'm not concerned about Toronto - an amazing city on a fantastic run of growth and urban development, the trajectory and momentum of which is well beyond the impact of any one poor addict, whatever office he might occupy.

Okay that's my comments on that topic closed. But hopefully the comments re knitting will henceforth be open around here! Fingers crossed!


11.05.2013

Shearer Step Six - Cable Cable Cable

Three weeks in. (Two weeks actual knitting time) and the back's worked as far as the bottom of the collar and the front to the midst of decreases for the sleeves. A bit behind where I wanted to be by now but nothing I can't make up.
6.0mm needle used on left portion - 5.5 used on right.
I moved to a 6mm from 5.5mm for this front panel to yield a slightly more ample midriff section. I prefer the more closely knitted back but its nonetheless the right thing to do for fit across the front.

The thoughtful bits are now close on the horizon

  • saddle shoulders with short row shaping
  • sorting out collar details
  • knitting and reworking the sleeve charts for a top down approach.


I'd like to try installing the collar before the sleeves (a la Asplund). As My Beloved's suitcase will barely have time to air out between long trips this month I'd prefer to have everything around the collar and shoulders nailed during his next brief "visit" home and then only have to work the sleeves while he's gone.
So I just need to keep on cabling! Every spare moment I have plus a bit later each evening than I'd like and an hour earlier each morning - easier now after the time change!
This yarn is truly glorious and oh so "creamy" (as EZ would say)

I mentioned this project to a non-knitter the other day and within moments I think she was hallucinating with boredom so its really gratifying you've taken the time to drop by! How fun it is to imagine people are following along with me on this.

Number One Son's coming home tonight after submitting a big paper today and no doubt having pulled a couple of recent all nighters. I'm bracing my self to see a gaunt, pale creature and cooking up both a hearty dinner and things for him to take back to school to consume in coming days. Its going to eat into my knitting time tonight but I have to admit I'm looking forward to feeding him!

Happy Knitting everyone!


11.04.2013

Craving Colour

I'll post about Shearer progress tomorrow but today, a confession....
Late last week, from the depths of "approaching the halfway mark -itis" I began to crave colour. Badly.
But I did not stray. (Completely) I didn't cast on or work on anything else. Over the course of a day, bit by bit as I had a couple of minutes to spare now and then I just hand wound a ball of crazy colour. It worked. That evening it was back to creamy coloured cabling.

Today my plan is a bit of creamy coloured poodle grooming where I'll clip off a pile of stuff like this...

Thanks for dropping by!


10.29.2013

Like Winning a Little Lottery

Yesterday morning the phone rang - yes we still have a land line - we're really antique that way and we are kind of fussy about being able to call 911 even if there's a blackout - anyway it was a woman from the neighbourhood who I chat with when we encounter each other walking our dogs.

She said she kind of remembered me saying sometime, in passing, that I knit. She wondered if I might have something called a "stitch marker" that she could borrow.

I said, yes, I did, but that if she was just starting out with knitting that plastic stitch markers were prone to bouncing away under furniture or between cushions on the chesterfield, often never to be seen again and so she might want to try making a yarn or string marker for herself.

..."that's exactly what's happened to my marker!" she shrieked as if I was clairvoyant. You mean you only had one? I asked.

She explained she was currently re-learning to knit after many, many years away from it, was taking a class, had been give materials for the project that included a single lone stitch marker. She had been working on her homework, the stitch marker flew off the needle and she couldn't locate it - anywhere. I think she was a little pleased when I told her her plight was one that befalls experienced knitters all the time. (Experienced knitters just have piles of markers always at hand to compensate! I didn't share that last bit - she'll figure that out for herself.)

Of course I offered to help any time she ran into trouble.

A new knitter in my neighbourhood! How fun is that? 'Feels like winning a little lottery it does!

10.28.2013

Shepherd Step Five - Decreasing for Armholes

We are at the armholes - "we" because there were myriad discussions and measurements with My Beloved over the weekend as I worked towards these first decreases 15.5" from the cast on edge.
He has more than a bit of travel on his agenda this week and next and with him gone I need an idea of how things are likely to come together with all the "stuff" at the top of the sweater so I can work on the bits leading up to that before he's back, available for "fittings".

It struck me over the weekend how straightforward these cables are compared to those I struggled with on Beatnik. Nora Gaughan's cables features lots of "business" within each cable where these are just 2 stitch "ropes" - predictably and reliably twisting over and under and only on right side rows to boot!

So tonight its more decreases and starting on the last 11.5" of the back (I'm lengthening it an inch and a half rather than working the symmetrical collar line), so I'm past the half way mark on this panel!

Thanks for dropping by! 

10.25.2013

Brrrrr! Yay!

The specter of winter is here with flurries north of the city and temperatures dropping. (I wore a knit sweater under a wool jacket, scarf and gloves on dog walks the past couple of days!)

We'll head north right into the teeth of it tomorrow for a day of cloud and cold sleet. We'll put up the winter window blinds, shutter the doors, clean out the eaves and pull out/winterize the boat. It sounds awful but actually its easier to walk away from the place with numb fingers and a cold nose (inside the cottage!) than on a warm sunny day with the water glistening as the blue jays scream and glide in groups from tree to tree.

I'm through the first repeat of the chart on Shearer and dead on gauge over 4 inches.

Nonetheless the 2x2 ribs at the sides are "stealing" width as they "pull in" together. I think the centre panel will block out enough to compensate but...
 ...to be sure I've decided to move from a 5 to 5.5mm needle.

I don't want to add ribs to the sides for fear of running short of yarn and besides, My Beloved is fearful of a repeat of "Ranger" (although in its shrunken, fulled state he's calling it his favourite "New" sweater and wearing it every evening) so he won't hear of me going up a size anyway.

Hence I'm just plowing on. If, in the end we need more room I can always knit a couple of gussets to run between the side seams - maybe I'll need more yarn - even if I do, a perfect match won't be as critical on flat narrow panels under the arms right?

With fall maintenance being done on our vehicles this week we've booked a date for the snow tires to go on and I'm working on readying the freezer for our beef delivery (grass fed, lean and hardy from a small flock raised by a friend - local, healthy, humane and environmentally better than many other options.)


High knitting season is upon us and I've got cables on the needles at home and WIP mittens stashed in my Blue Jay bag ready to hit the road as needed! Life is good! Have a great weekend - that's what I plan to do!

(Multiple references to Jays here today - must be because I just read this. Great photos Curlerchik! Blue Jay project bag courtesy of Curlerchik too!)


10.23.2013

"Ganomy Hat" by Elizabeth Zimmerman FO

Pattern: "Ganomy Hat" by Elizabeth Zimmerman
Source: Knitter's Almanac by Elizabeth Zimmerman
Yarn: Remnant Worsted Held Double
Needles: 5mm dpn's
Start: October 1 Finish: October 3, 2013
Modifications: None
Poor Ganomy. Finished three weeks ago yet in the "shadow" of "Shearer", not  given a proper public launch until now. This in no way reflects my true feelings about this quick little project. It was entertaining from start to finish, used up more remnant yarn and best of all I am unreasonably thrilled with this hat! Clearly, from the reaction of my loved ones when I modelled it, it is not the best look for me. But it feels so great on and if I pull it down it will keep ears and neck warm - soooo important on my twice daily, often long outings with the dog.
My Ganomy will be a Bitter January Afternoon Hat or a Blustery February Blizzard Hat. The kind of thing you put on when warmth comes above all else not only for comfort but because you know the conditions will be so bitter no one you might meet will be looking at how you look - they'll be too busy trying to keep themselves warm!
The application of mitred shaping to a hat while also working the technique on mittens was interesting to explore and I love how the back of the hat shows that structure as the graphically attractive feature it can be.
Beyond that I'm pleased I resisted my initial impulse to work a bold colour in place of the Oatmeal Grey band. The silhouette is plenty playful without adding bright colour to it as well.
I also quite like the 2x2 row of coloured "notches" at the base of the Oatmeal section that then becomes 1x1 up in the confines of the narrow tip top when changing back to the cream yarn.

With Ganomy finally given its "due" I think I'll indulge in a couple of rows of "Shearer" now. Thanks for dropping by!

10.22.2013

Maybe the Knit Gods Know Best

Remember this...

A bit big at the start - after several wearings and My Beloved having shed a few pounds in recent months, now, a LOT big - longer, baggier, frankly all the way to sloppy.

My Beloved doesn't "do" sloppy but he knows I'm watching to see if that knit gets worn so one day he offered to "help me roll the all balls of yarn"  if I wanted to rip, skein, wash and re-knit the thing. As generous as that offer was, I said "thanks" but No.

I decided instead to run a long seam from the cuff to the hem via the underarm and see if I couldn't make the thing more wearable. If it worked, honestly, I was ready to just chop out the excess and call it a day.

First though, a bath. In a sweater bag, with other knits all in their own bags, on the delicate setting. The other knits came out as they always do - just fine. The behemoth sweater, though, felted like there was no tomorrow. (I'm assuming the beast, too big for even the largest sweater bag, suffered excessive rubbing in confined quarters.)

When I discovered it I smoothed it out as best I could - even had to separate the insides of the sleeves that were on they way to becoming one, then I laid it out to dry.

This morning in the wee dark hours before he left for work he quickly tried it on. I'll have to get a picture of it to post later but let me tell you it now fits like a dream.  Even the sleeve length is dead on. He's thrilled and probably relieved he can now demonstrate my efforts knitting for him are appreciated.

The Knit Gods protected the sizing as they sacrificed my hand wrought stitches for the good of the garment and the marital bliss between its maker and recipient!

Oh well, knitting "love" being as fickle as it is, I'll just have to focus on "Shearer" and forget about poor "Ranger's" shift from drapey, fluid if unwearable "sophistication" to stiff, serviceable and probably oft-worn popularity.

Onward!

10.21.2013

Shepherd and Shearer Step Four - Knitting Officially Begins Today!

Buoyed on by chatting with Fiona at the DKC and then her encouragement in the comments with a couple of (obviously) relevant tips from the Queen of Cables herself, I dove into working the set up rows of the first side.

Here's the thing though - if I wanted all cables to flow out of the 2x2 ribs, the ribs themselves -how they are arranged need to be a set up of sorts...

Planning this aspect, the math told me I needed to add 13 stitches that I would decrease away with k2togs in the actual set up row from my revised chart. That stitch count though meant extra inches of loosey goosey width around the bottom of the sweater. Not good. So I used a soft, long tail cast on for stretch on a smaller (4mm) needle and knit the waist band pretty firmly, working up the whole 2.5" depth of the ribbing I've chosen to anchor the design. (The guy's over 6' tall - he needs and can carry something pretty substantial) This allowed me to gauge how well the waist band would/could do its natural "thing" - pull in but also be able to stretch out.

Then I held my breath and measured and holy mackerel, it worked!

After that I moved up to 5mm straights (I prefer their firm stability over a wobbly thin circular cable when lots of counting is required) to work the vertically swatched cabled elements now having to follow one after the other in a sequence across with the width of the waist.

I knew the stitches between the elements and on either side of the cable panel were my concern at this point as was making sure I had edges that would work together when the sweater is assembled.

You won't believe what happened....that worked out too! So then it was off the crowded straight, onto a nice roomy circ. and before I knew it I was at the end of the first 6 row chart and able to just see clearly how those ribs flow!!!
(FYI The central orange marker denotes the location of the 2 purls that would be worked together to form the centremost stitch of the sweater front and central cable motif. The pink markers above that are either side of that now single purl stitch that became one stitch from two behind that first cable cross.

The two orange markers bracketing that central one, are the points at which I cheated by placing the centre point of each major side cable, two purl stitches apart rather than right together as the pattern is written, to facilitate the flow of the ribbing into those elements.

I successfully fought the urge after that to just plow on, instead, setting that piece aside and casting on to knit the second panel's 16 rows of ribbing. Next I'll do the first 6 row chart for that side while every thing's still fresh in my mind and then I'll be able to sit back, relax and enjoy multiple inches of delicious creamy, woolly cabling.

Once I get a bit of length established on the first panel I'll use it to do some measurements on My Beloved and sort out how the cables will work with and around the shaping for armholes and neck.

Thanks to Fiona for the encouragement and tips! Thanks to you for dropping by!

10.16.2013

Meanwhile

"Shearer" demands cerebral attention so post-Dog Obedience Class last night, I enjoyed mindless knitting on what's becoming a mitred project with a second pair of EZ Mitred Mittens in Crimson worsted because I'm....

  1. Hesitant to snip an afterthought thumb hole into the Biscotte & Cie version without any sense as to how location and execution in this pattern might play out
  2. Admittedly interested in working a pair with a few mods from Pair #1.

With 64 stitches cast on instead of EZ's prescribed 48 I'll get additional width for my boxy hands but I know I'll have to release the thumbs from the mitten palms before knowing whether the 64 stitch "recipe" is the one for me.

Truth be told, mittens aren't the only EZ mitres I've been playing with - 'seems her concepts, grounded in experimentation inspire me to experiment too - anyway I've also worked up a "Ganomy" Hat - more miters yielding unique and practical shaping. (With Darling Daughter back from "over the pond" my camera is also back so I'll be able to share shots of that with you tomorrow.)

Tonight is the DKC presentation of new and exciting yarns for the 2013/14 season. I plan to arrive early and get raffle tickets a-plenty. The door prizes at this meeting are always fabulous. One time I won enough Bulky Alpaca to make this! With lots of prizes, 150 or so knitters in the room, not all of whom buy tickets, the chances are pretty good - as are the causes the DKC supports with the proceeds so I'm off to fill up my wallet with loonies and twonies from the change jar in preparation.

Thanks for dropping by eh?

10.15.2013

Shepherd and Shearer Step Three - Swatching

Little Swatch. Big Job.

It was no simple "check the needle size for gauge" kind of swatch job over this past extra (Fri. through Mon.) long weekend.

Rather it was working to fill a swatch with deceit and deception - create an impression that the elements of the 91-stitch cabled panel that adorns sweater front and back flow from a 2x2 ribbed border. (Said border not used in said pattern you see.)

I've never knitted such a lie! I was an utter innocent but no more...

I hadn't a clue what to do as I started but armed with the words from Asplund's blog..."try as much as possible" to make the ribbing work with the cables I tried to just dive in with an open mind as to what "try" might entail.

In the end I created stitches where they did not belong, p2tog-ed behind many a crossing where none was called for and so, naturally had to cast on more than really needed.

I changed a field of ribbing between cables over to a more usual purled background .

In one instance I had to accept one treatment wouldn't start with diverging cables side by side but rather slightly apart then I decreased the extra 2 purls out of existence on the next row.

Blasphemy! How dare I challenge THE DESIGNER?

I got over that, I "dared" and I did it!

Now I'm onto a larger kind of swatching project.  Having determined the revised total number of stitches I need, I cast them on and marked where each cable element should start. Atop just a few rows of ribbing I'm now seeing if my revisions and new stitch count will play out correctly across the full width of the front panel. Once I have that nailed I'll knit the first few rows of the chart then cast on and get the back to the same point while the "lies", while duly noted on paper, are still fresh in my mind and hands. Then I'll knit up a couple of cabled rectangles/prepare to tackle revising the necklines.

I have thought the neckline through and done a lot of math around it but I've taken it as far as I can without having something concrete to hold up and consider. So that's the plan. Just wish I was looking at another 4 day weekend to devote to this!

Thanks for dropping by today!